
This article will create a list view with customized cells with grouped and plain styles. If you’re new to Swift UI, I tell you, it is straightforward to make a List view in Swift UI. Swift UI makes list implementation simpler than UIKit. Creating a list is as easy as calling the built-in List control.
  List {
       //Content
  }
Here, we will create a Customized list in Swift UI properly and simply and learn how to create a custom list in SwiftUI in a better way. We will use MVVM architecture in this example.
How to create a custom list in SwiftUI?
In the below screenshot, CustomListCell Struct defines the whole structure of the cell.

This CustomListCell is here to be used to show product information in a list or table view. Here’s a breakdown of the code of the CustomListCell struct:
Properties:
‘productModel’ Here we take the object of ProductModel to pass product details from the table view to the cell. Below is the screenshot of the ‘ProductModel’ class which is in the ‘Model‘ part of the MVVM architecture.

Body:
The body of the view is a ZStack, Alignment set to .leading, for content should be aligned to the leading edge of the stack.
Content:
Inside the ZStack, there is a VStack containing a HStack and a Divider. The divider is for showing the separator line in each cell. HStack contains few components. that are arranged horizontally.
1. An is used to asynchronously load and display an image from a URL (specified in the AsyncImageproductModel?.image). A placeholder (ProgressView) is shown while the image is being loaded. The image is set to be resizable and has a fixed size of 50×50 points.
2. A Spacer with a minimum length of 1 point.
3. Another VStack containing two Text views. The first Text displays the product name, and the second Text displays the product description. These texts have different font sizes, weights, and colors. The whole VStack is aligned to the leading edge with a padding of 15 points.
4. Another Spacer to adjust the remaining space.
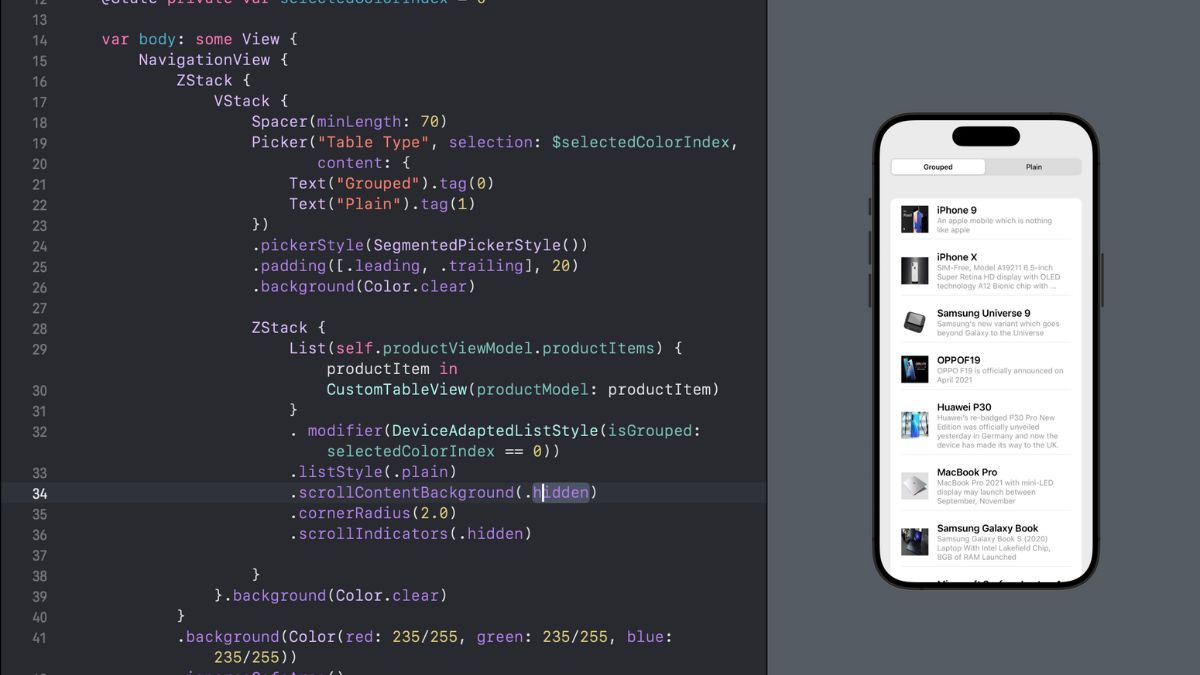
We will use this custom cell in the table view in the below screenshot. This is the View part of the MVVM

Here’s a breakdown of the key components of the main Content View:
Properties:
productViewModel‘ An observed object of type ProductViewModel. This is an object of ViewModel responsible for managing data related to products. It is @ObservedObject type, which means it will update the value over View, whenever data is changed in the ViewModel class.

The above screenshot, ProductViewModel confirms ObservableObject the protocol, Here item list is marked with @Published, It will automatically update changes to the property where it will be used. In the example, we are taking static data, But We can fetch items from the server in the load function. whenever data is updated from the server, it will automatically notify the View (List view).
ZStack contains a List of product items using CustomListCell for each item. The DeviceAdaptedListStyle modifier is applied conditionally based on the selected index, determining whether the list should be grouped or plain. The list is styled as plain and has some additional customization for appearance
. modifier(DeviceAdaptedListStyle(isGrouped: selectedIndex == 0))This is a custom modifier to put the condition for selecting List style Plain or grouped.

Conclusion:
In Swift UI, List view is a strong and adaptable SwiftUI component that allows you to present a group of data in an interactive, scrollable format. It offers an organized approach to presenting information neatly and effectively. The list view is simple to customize and requires less work. There are far fewer lines of code than with UIKit.
You can find a sample project from GitHub – https://github.com/ChamanSharma1234/SimpleListView_SwiftUI.git
Friends, If you are getting any issues related to Swift | Swift UI | iOS, Please comment below, and I will reply to you. Thanks