
The use of property wrappers by SwiftUI to control state and data flow inside an application is one of its primary features. We’ll examine the variations between the @State, @Published, @ObservedObject, @Binding, and @Environment property wrappers in this article. We will use the best example to better understand property wrappers in SwiftUI:
@State:
It’s used for managing the local state within a view only, allowing the view to automatically update when the state changes. A @State variable is owned by the view instance, it remains persistent in memory as long as the view exists. This also implies that its lifecycle is within the view’s lifecycle. @State property is always used within view and never used outside of it.
When that state changes, SwiftUI knows to automatically reload the view with the latest changes so it can reflect its new information.
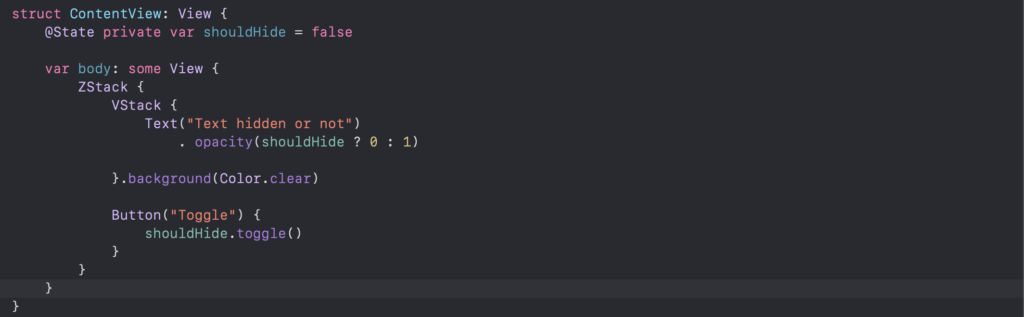
In the example above, the label will appear if the should hide state variable is false, otherwise the text opacity will be 0. The state value is changed to true or false by the toggle button. Upon clicking the ‘Toggle’ button, the view will reload and adjust its opacity based on the current state value.
Best Practices:
- Use @State for simple, locally within view and keep @State properties private to encapsulate state within the view.
- Avoid using @State for complex data models or shared data—use @ObservableObject, @Published, and @EnvironmentObject for those cases.
@ObservedObject:
In SwiftUI, the @ObservedObject property wrapper is used to establish a connection between your user interface and a class that conforms to the ObservableObject protocol.
If we talk in the context of MVVM – the @ObservedObject property wrapper is used to establish a connection between View and ViewModel. ViewModel that conforms to ObservableObject.
When we mark property with @ObservedObject, It tells SwiftUI that the view should be updated when data within this object changes.

@ObservedObject: You use this in a SwiftUI view to declare that the view should respond to changes in an instance of an ObservableObject. The view listens for any changes to properties on the object marked with @Published and updates accordingly.
In the above example, ‘productViewModel’ is an ObservableObject, that binds the List view with its @published property ‘productItem’ array, If there are any changes made to productItem, the List will automatically reload.


@Published: This property wrapper is used within an ObservableObject to mark properties that should cause views to update when they change. When a @Published property’s value changes, any views observing the object will be notified to re-render.
ObservableObject: This is a protocol that allows instances of a class to be monitored for changes. When a class conforms to ObservableObject, it can notify other parts of your app when its state has changed.
@Binding:
Instead of holding the actual data, a @Binding variable holds a reference to the data, allowing you to mutate a state that is owned by another part of your app.
Here’s a simple example to illustrate how you can use @Binding in a SwiftUI application:
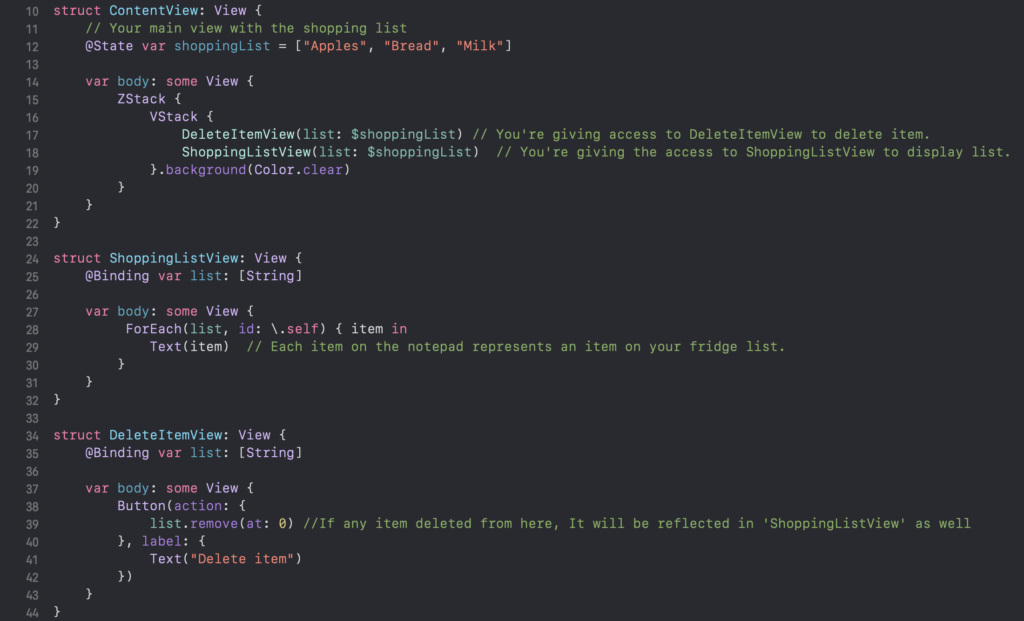
Imagine you have a shopping list on your Main View (ContentView). This list is what you’re going to buy from the store.
You have been given access to ‘ShoppingListView’ to show the item list and ‘DeleteItemView’ to delete items.
With the help of the @Binding, ‘shoppingList’ binds to ‘list’ in ‘ShoppingListView’ and ‘’DeleteItemView’. This means ShoppingListView and DeleteItemView using references of main showingList.
If any item is deleted from the ‘Delete item’ button, This will be updated on the main shopping list. And ShoppingListView will display the remaining item only.
@Environment:
@Environment in SwiftUI as a way to access shared information or settings across your app, like passing a preference to all parts of a house without having to hand it to every person inside.
What is @Environment?
@Environment is a property wrapper in SwiftUI that allows you to access and use data that is provided by the system or set up by you to be used across multiple views. This data is stored in what’s called an “environment,” which is a shared space that any view can access if it has permission.
Understanding @Environment
When you declare a property with @Environment, you’re telling SwiftUI to provide the value from the current environment your view is running in. The environment is a collection of values that define the context your view operates in—like the current locale, timezone, color scheme, and more.
Why Use @Environment?
The main reason to use @Environment is to keep your views decoupled and reusable. Instead of tightly linking your views to specific data sources or passing numerous parameters down the view hierarchy, you can rely on the environment to provide this information.
Let’s take an example showcasing the usage of a predefined environment variable in SwiftUI:

With @Environment, you can peek at these global settings without having to carry them around everywhere in your app. For instance, using @Environment(\.colorScheme) var ‘colorScheme’ gives you access to whether the app is in light or dark mode.
Note: You can explore the @Environment property wrapper here.
Conclusion:
In short, SwiftUI uses special codes like @State, @ObservedObject, @Binding, and @Environment to help handle data in apps. Knowing when to use each one helps keep your code neat and responsive to changes in data.
Remember:
- Use @State for your private data in a single view.
- Use @ObservedObject for data shared across different parts.
- Use @Binding for data that can change and isn’t owned by the view.
- Use @Environment for global values.
Getting comfortable with these tools will help you work better with SwiftUI’s way of handling data!”